Set Up Blacklist Connection Between Stores
Connect Blacklist Manager across trusted stores with Host and Sub site modes, secure keys, sync tests, and revocation controls.
Blacklist Connection lets multiple trusted stores share blacklist data. One store acts as the Host site, and other stores connect as Sub sites.
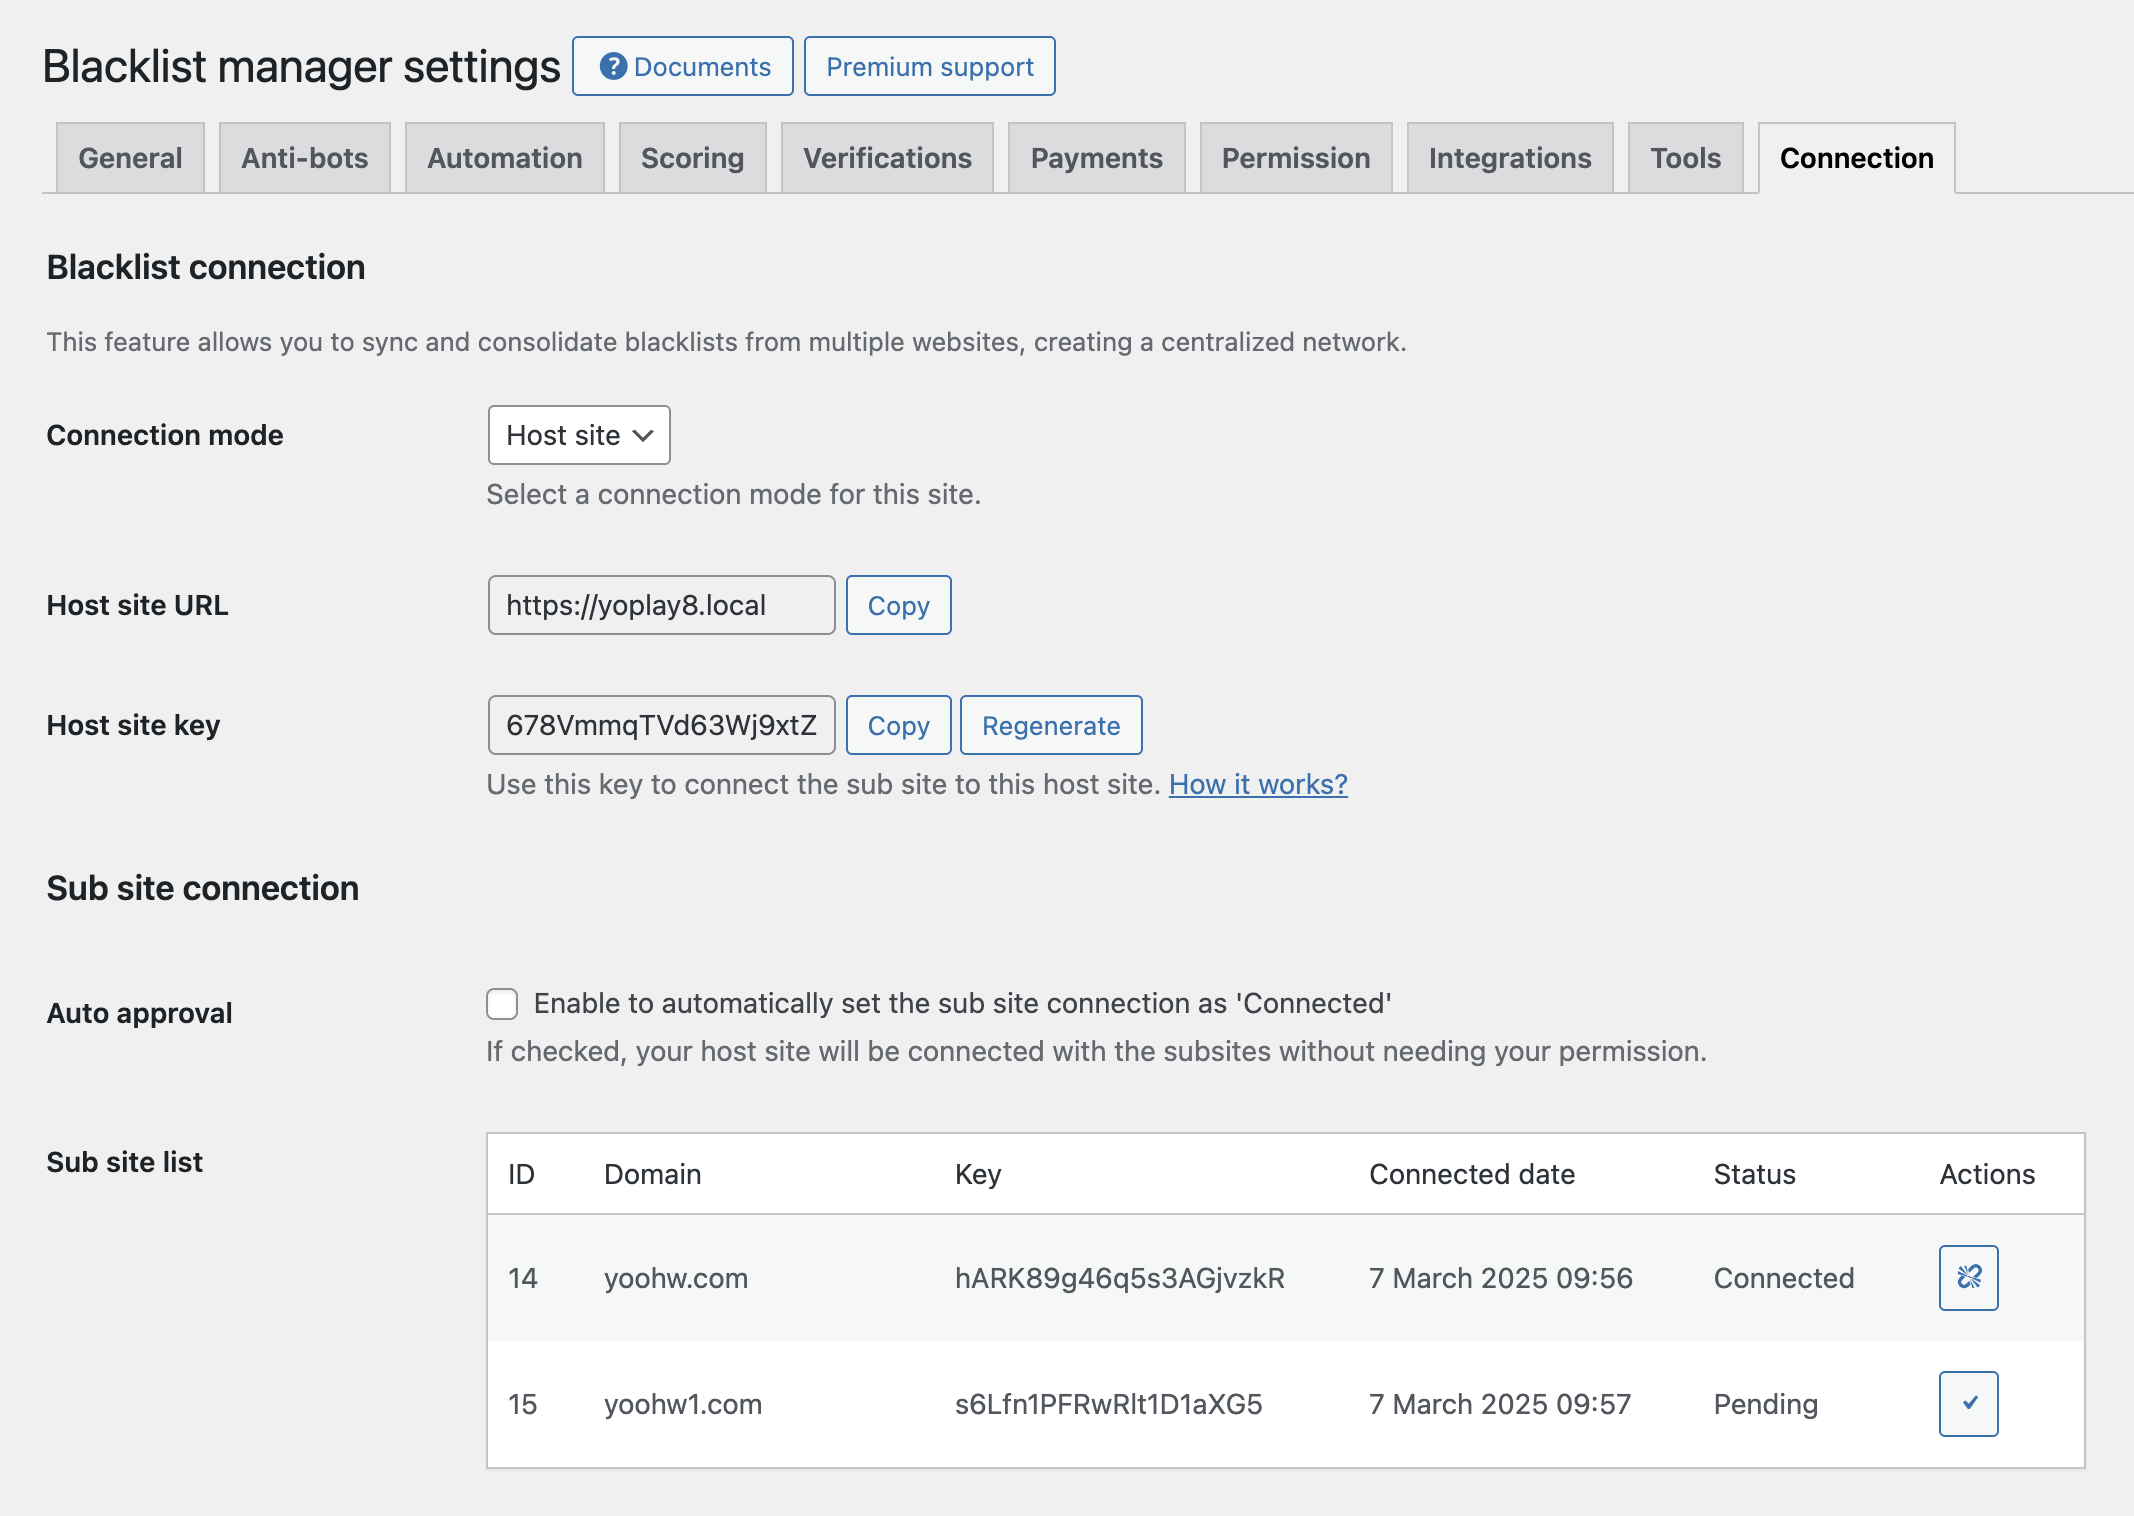
When to Use Blacklist Connection
Use Blacklist Connection when you own or manage multiple stores and want blacklist entries created on one store to become available on the others.
Do not use it to connect stores you do not trust. Connected stores can exchange blacklist data, so a bad or careless source can affect other stores.
How the Connection Works
Blacklist Connection uses a host/sub site model:
| Mode | Role |
|---|---|
| Host site | The central store that receives sub site requests, stores connected sub sites, and can send blacklist data to connected sub sites. |
| Sub site | A connected store that sends blacklist data to the host and can receive blacklist data from the host. |
| None | No store-to-store blacklist sync. |
What Data Can Sync
When supported actions create or update blacklist data, the connection can send details such as phone number, email address, IP address, domain, blocked/suspect state, customer address, first name, last name, and source reference.
The source reference helps identify where an entry came from. When data is forwarded through the host, the plugin avoids sending it straight back to the original source site.
Before You Start
- Install and activate the core plugin and Premium plugin on each connected store.
- Make sure each store can reach the other store over HTTPS.
- Make sure WordPress REST API requests are not blocked by security plugins, firewall rules, or basic authentication.
- Decide which store should be the host before connecting sub sites.
- Export blacklist data from each store before testing sync.
Set Up the Host Site
- Open the store that should act as the central host.
- Go to Blacklist Manager → Settings → Connection.
- Set Connection mode to Host site.
- Copy the Host site URL.
- Generate a Host site key.
- Copy the key and store it securely.
- Decide whether to enable Auto approval for sub sites.
- Save settings.
Auto Approval vs Manual Approval
If Auto approval is enabled, a sub site can become connected after it sends a valid connection request.
If Auto approval is disabled, new sub sites appear in the Sub site list as pending. A host admin must approve them before data can sync.
For most stores, manual approval is safer. Use auto approval only when you fully control all connecting stores and the host key is handled securely.
Set Up a Sub Site
- Open the store that should connect to the host.
- Go to Blacklist Manager → Settings → Connection.
- Set Connection mode to Sub site.
- Enter the Host site URL copied from the host.
- Enter the Host site key.
- Use Test link if available to check that the host can be reached.
- Click Send connection.
- Return to the host site and approve the sub site if manual approval is required.
- Confirm the sub site shows Connected.
Manage Connected Sub Sites
On the host site, the Sub site list shows connected or pending sub sites. You can approve pending sites or revoke connected sites.
Revoking a sub site stops that site from syncing new data. It does not automatically review every blacklist entry that was already synced, so check your dashboard if you need to remove old entries manually.
How to Test Sync
- Connect one sub site to the host.
- On the sub site, add a harmless test blacklist entry.
- Wait briefly because sync can be scheduled in the background.
- Check the host site dashboard for the synced entry.
- If the host has another connected sub site, check whether the entry appears there as expected.
- Remove the test entry after confirming sync behavior.
When Sync Does Not Work
- Confirm both stores are using Premium and the license is active.
- Confirm the host is in Host site mode and the sub site is in Sub site mode.
- Confirm the host URL is correct and does not point to the wrong environment.
- Confirm the host key is copied exactly.
- Check whether the sub site is still pending on the host.
- Check whether security plugins or firewall rules block REST API requests.
- Check whether the site is in a local/staging environment that cannot be reached by the other store.
Security Recommendations
- Only connect stores you own or fully trust.
- Keep the host key private.
- Regenerate the host key if it may have been exposed.
- Use manual approval unless all sub sites are controlled by the same team.
- Review synced entries before enabling aggressive automatic blocking across multiple stores.
Connection vs Global Blacklist
Blacklist Connection is for syncing data between your own trusted stores. Global Blacklist is a separate network-level service for checking broader fraud signals. Use Connection for your store network; use Global Blacklist when you want external risk intelligence.
Expected Result
After setup, connected stores should share blacklist entries through the host/sub site connection. Store staff should be able to see where synced entries came from and revoke a connection if a store should no longer participate.
Continue from Blacklist Manager Premium documentation to the complete product workflow.
Evaluate product scope on the money page, use the pillar Guide for decisions and trade-offs, and return here for exact configuration.
Did this guide answer your question?
Still stuck?
Open a support request and include this article title, your plugin version, and what you already tried.
Open Support